Wednesday, April 7, 2010

Warm-Up Jumps

There are many rules dictating which warm-up jumps are legal and which are illegal. Familiarizing yourself with these rules ahead of time will allow you to formulate a warm-up plan without running the risk of having to use a different routine at the show after intervention by a steward.

There is an excellent document that I believe everyone should look at showing the FEI warm-up rules very clearly with photos: FEI warm-up rules

Equine Canada deviates slightly from these rules:

GENERAL- SCHOOLING RULES FOR HUNTER, EQUITATION AND JUMPERS
1. All EC-sanctioned competitions must use current FEI schooling rules as listed. Refer to Chapter 9, FEI Rules, Article 244 EXERCISE AND SCHOOLING AREAS AND PRACTICE OBSTACLES. These rules pertain to all hunter, equitation and jumper classes and divisions at all EC-sanctioned competitions. Note exceptions below.
2. The prize list must specify that FEI schooling rules will be in force.
3. Stewards will measure any obstacle or distance that appears to be in violation of the rules.
4. When two or more rings are operating simultaneously, the competition must have sufficient stewards to monitor all schooling/warm-up areas. Schooling/warm-up areas that cannot be closely monitored simultaneously MUST have a steward for each area. The additional steward(s) may be recorded.
5. Equine Canada exceptions to the FEI schooling rules at all EC-sanctioned competitions:
a. Use of coloured sheets over the take-off side or under a properly constructed obstacle is permitted.
b. Flags on fences in the schooling areas are at the discretion of competition management. Steward may request flags be used when the schooling area is congested.
c. In Equitation and Hunter competitions and schooling rings, plastic cups or FEI breakaway cups are required. Steel pins are not acceptable. See Article G116.
d. Boot and bandage checks are not mandatory; however a boot and bandage check may be performed at EC-sanctioned jumper competitions.
e. Hunter Schooling only: A ground rail may be used on both sides of an oxer. Top rails may not be offset.

Here are some of the main points to remember about warm-up jumps:
  • The lower tape on the standard is at 1.30m (4'3") and the higher tape is at 1.60m (5'3")
  • If a vertical or the front rail of an oxer is at 1.30m or higher, you must use two rails on the take-off side
  • Never use an offset oxer (back rail lower than the front rail)
  • You may not warm up over a jump that is over 10 cm (4 inches) higher than the maximum height of your class
  • If flags are used, always jump in the correct direction.  You may switch the flags to reverse the direction of the jump if the steward allows it
  • If you use ground lines, you may not have one on the landing side only, and you may only use a ground line on the take-off side of an oxer
  • If you use ground lines on both sides of the jump, the take-off side must be the same distance or further away from the jump as the landing side
  • At an EC-sanctioned competition, you may drape a cooler or sheet over the take-off side of a jump


Tuesday, April 6, 2010

Trouble at the Ingate

Some horses do not enter the show ring well. In such a case, you might be tempted just to take a run at it, but you need to be very careful around the in-gate or you risk being eliminated or, worse, hurting someone!

It is forbidden to trot or canter through the in-gate unless you have been given permission to do so (and even then, you must leave the ring at a walk). If you feel that you absolutely must trot or canter into the ring, inform the in-gate person of it while you're still a couple of horses out. Not only will the in-gate person be able to allow you to enter the ring at speed, but he or she will also make sure that the in-gate area is kept clear for safety purposes.

As soon as you are on deck, start informing those around you that you have a difficult loader and ask them to clear the in-gate area. In the interests of safety, do not attempt to enter the ring until the area is completely clear.

If you have a difficult loader but would like to take it more slowly, you can have someone on the ground lead you into the ring. One of the safest methods of doing this is to have the ground person loop a lead shank through one side of the bit and lead from that so that no unclipping will be required once the horse is in the ring; the shank is simply allowed to slip back through the bit. This also allows the ground person to keep some distance from the horse should anything go wrong.

Even if you do not plan on trotting or cantering your difficult horse into the ring, it's a good idea to inform the in-gate that there might be a little scene when you attempt to go through the in-gate. Again, tell everyone around you when you're on deck that it's time to clear the in-gate to prevent anyone from getting hurt.

Some horses do better if they don't wait right at the in-gate. If you plan on keeping your horse away until the last moment, make sure that you have someone on the ground at the in-gate both to keep anyone else from taking your spot and to keep the in-gate clear.

The EC rule for entering and exiting the ring is the following:

ARTICLE G104 IN-GATE
In all classes, trotting or cantering through the in-gate without prior permission is forbidden. The penalty for contravening this rule is either a fine or elimination from the class, at the discretion of the judge. Under special circumstances, a steward or judge may give permission for a horse to trot into the ring, but not out of the ring.


Monday, April 5, 2010

Clipping

While most horses are perfectly fine in the summer months with their natural summer coats, some horses grow too much of a coat to be comfortable while working hard in the heat. In such a case, doing a full body clip is the best way to go. Clipping can also make a horse who sweats heavily look sleek and clean instead of wet and wavy.

There are many different patterns out there, but only two are appropriate for the hunters, as well as for ideal jumper turnout. The two options are the full body clip and the full body clip with a saddle patch.

In the full body clip, all of the hair is clipped from the body, legs and all or most of the head. How much of the legs and head you will have to clip will depend on how long your horse's natural coat is. If it is not excessively long, you should be able to clip the cheeks and under the jaw, blending the clip in with the natural hair where the cheek pieces of the bridle sit. If your horse has a very hairy face, you might need to carefully clip the entire face in order to prevent it from becoming drenched with sweat and to avoid an obvious clip line.

If your horse has very hairy legs, you will probably need to clip all of the way down each of the legs. If the legs are not excessively hairy, you might be able to blend the clip in with the natural hair somewhere along the forearm. As long as you don't end up with a blunt line, it should work. Your horse's colour will also play a part in determining how far you will need to clip. If the clipped colour is very different from the natural colour, you might not be able to blend the two together. Bays, especially the darker ones, are generally easy to blend because of their black stockings.  

If your horse has any white legs, clipping them will make them much easier to clean and keep white!

Some riders like to leave a saddle patch of longer hair on the horse's back to provide extra protection. If you choose to leave a saddle patch, make sure that it is small enough to fit under your show saddle pad without any of the longer hair showing. The patch is generally only under the seat of the saddle, rather than extending down under the flaps where the horse is likely to sweat. Keep in mind that this patch of hair will be visible if you need to remove your tack to jog in front of the judge.

If you have never clipped a horse before and you plan on showing, it is a good idea to hire a professional to clip your horse. Clipping is learned hands-on and even the best of beginners is likely to leave some unsightly lines after a first attempt. If you would like to learn how to clip, it would be best to learn either in the winter when you will not be showing or on friends' horses that will not be showing. When you're in the show ring, you want the judge to be focused on your round rather than on the quality of your clip job. The clip should look as much like a natural summer coat as possible and clip lines look anything but natural! 


Sunday, April 4, 2010

Option Jumps

In some jumper classes, usually schooling or speed classes, the course designer might decide to include one or more option jumps. When there is an option jump, you may choose either option that is offered to you after weighing the pros and cons of each.

Why might there be an option jump? First, when it comes to speed, you might have a more difficult but direct option and an easier but longer option. A more experienced horse and rider might choose the direct route while a less experienced horse and rider might decide to play it safe and take the slower route. The difficulty could be in the height, width or type of jump. A spooky jump such as a liverpool or a dry ditch could be used on the faster track while a straightforward oxer or vertical provides the safe option.

In a schooling class, including option jumps might allow the course designer to provide opportunities for the more advanced horses to school over open water or something similar without requiring everyone to jump it.

How will you know if there are options in your course? First, look on the course diagram to see if there are two jumps with the same number in the course. There should also be "option," written between them. When you walk the course, look for jumps near one another that are both flagged and have the same number.

What happens if you have a refusal or run-out at one of the options? You are allowed to take the other option for your second attempt, although you must wait for the initial jump to be reset if you have dislodged it.

Here is the official EC rule for option jumps:

FEI ARTICLE 215 ALTERNATIVE OBSTACLES AND JOKER
1. When in a competition two obstacles of the course carry the same number, the competitor has the choice of jumping either one of the obstacles:
1.1. if there is a refusal or run-out without a knock-down or displacing of the obstacle, at his next attempt the competitor is not obliged to jump the obstacle at which the refusal or run-out occurred. He may jump the obstacle of his choice;
1.2. if there is a refusal or run-out with a knock-down or displacing of the obstacle, he may only restart his round when the obstacle knocked down or displaced has been replaced and when the Ground Jury gives him the signal to start. He may then jump the obstacle of his choice;
2. Red and white flags must be placed at each of the elements of this alternative obstacle.


Saturday, April 3, 2010

The Order of Go

After your hours of preparation and your perfect warm-up, the last thing you want is to arrive at the in-gate only to find out that there is a line of horses ahead of you and you'll have to wait half an hour for your turn! That's why we have orders of go. If you decide to get ready whenever you want, you risk not being able to go into the ring or, even worse, being eliminated for not following the posted order.

A posted order is a list of who goes when in the class, determined by the show office. Posted orders are generally used in the highest priority ring at the horse show. How faithfully the in-gate follows that posted order will depend on the horse show and on the particular class. You won't be able to move around in a big grand prix, but in smaller classes you will sometimes be able to change your order if you have a good reason to (trainer conflict, rider conflict, etc.). If you absolutely will not be able to be in the ring for your spot, talk to the in-gate ahead of time. The worst thing that you can do is to just not show up until later.

Classes like grand-prix, mini-prix, medals and hunter classics or derbies are generally run as posted order.

Sign-in orders are more casual orders of go that are created by the in-gate person. Before your class starts, you will need to go speak to him or her to put yourself in the order. Riders can choose any spot they want out of whichever ones are left (it pays to put yourself in the order early in the day so that most of the spots will be open). There is more flexibility in this type of order since spots might need to be opened up for trainer conflicts, so you might not end up being called into the ring exactly where you signed up, but it should be pretty close.

How do you know whether your class will be run as a posted order or as a sign-in? The best way to find out is to ask the in-gate person directly. There are, however, some clues that can give you a good idea before you ask. Check the exhibitor numbers on the class list (it should be posted at the in-gate and at the show office). If those numbers are in increasing order, chances are that you're looking at a class list rather than a posted order. If those numbers are random, chances are that it's a posted order. Sometimes the office will make the class list look like a posted order anyway, just in case the show wants to run it that way, so it's a good idea to check with the in-gate to make sure that you don't need to sign in. If there is a signature on the class list, it is most likely a posted order.

If you're riding in the hunters, you should familiarize yourself with some terminology before signing in. Because hunter classes are generally run in groups of two or three over fences at the same time, there is a difference between the number of 'trips' and the number of 'horses'. A 'trip' is a single class, whereas a 'horse' is two or three classes (depending on the schedule). Ask the in-gate specifically whether you are putting yourself in the order at a number of trips or at a number of horses so that you can plan your time accordingly.

Jumpers don't need to worry about this since only one class is run at a time, therefore the number of rides is the same as the number of horses. 


Friday, April 2, 2010

Walking the Lines

If you plan on competing in the jumper ring, you will need to learn how to walk the lines in order to plan out your round. Walking the course will allow you to measure out the distance between two jumps to determine how many strides to put in the line, as well as what length of stride you will need.

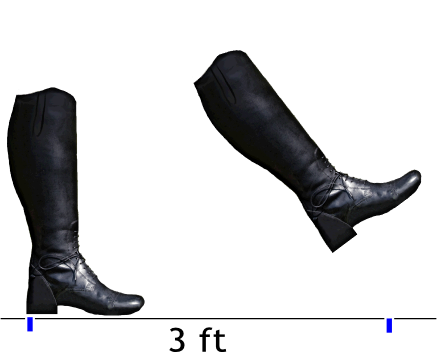
If you have never walked a set distance before, start at home by marking out twelve feet on the floor (masking tape works well). If you want to be really accurate, put a little mark every three feet.

Now, place one heel on the tape at the very start of your twelve-foot line.  


Take one big step forward with your other leg so that the heel lands on the three-foot marker.  


Now continue walking so that your other heel  lands on your six-foot marker, and continue like that until you have walked the full twelve feet. Keep walking back and forth down the line, making sure that your heels always land on the tape. Get a feel for how big that step is because you will be using those three-foot steps to make your measurements in the show ring.


Once you're consistently walking the line correctly at home, try the same thing in a sand ring at the barn. Place two rails twelve feet apart on the ground and walk between them until you are consistently getting four even steps. You should start by placing your heel up against the first rail and finish by stepping over the second rail with your heel just touching it. Measuring from heel to heel gives you a much more accurate measurement than using other parts of your foot. Chances are that you will need to make a slightly bigger effort when walking in sand because you will sink into it. Remember what that feels like; you will need to know how to walk in different types of footing.

Now you can try walking a line! Set up two jumps in a straight line, some multiple of twelve feet apart. The line below is 36 feet long.


Your average horse's stride in the jumper ring is twelve feet, which corresponds to four of your steps. Your take-off and landing will each take up about six feet for a combined total of twelve feet. This means that when you are faced with a 36-foot line, your horse should take two strides between the jumps.

In order to walk the line, you should stand at the center of the first jump with your heel directly underneath it. Now walk forward, using your three-foot stride, and count how many steps you get between the jumps, finishing with your heel directly underneath the second jump. Different methods of keeping track of the steps work for different riders. Some like to count how many steps they have taken and then do the math at the end of the line. I, personally, count with my fingers by sticking one finger out for every four steps that I take. At the end of the line, I fold one finger back down to account for the combined take-off and landing distance and the number of fingers that I have left sticking out corresponds to the number of strides that I should put in the line.

Always remember to take that take-off/landing distance away from your count. If you reach the end of the line and you have to put an extra step in to get your heel right under that second jump, the line will ride forward. If you reach the end of the line before finishing a twelve-foot set, the line will ride short.

You don't have to walk from the center of each jump for a straight line, but you do need to be consistent in where you walk from. Unless you plan on angling a line, you cannot count accurately by walking from the center of the first jump to the right side of the second jump. If you start walking on one end of the first jump, walk to that same spot on the second jump. For a bending line, walk from center to center (or whichever spot you plan on jumping from) and try to walk a line with the same degree of bend that you plan on using with your horse. Swinging out wide or jumping to one side will change the amount of ground that you need to cover.

This is something that you will need to practice a lot at home before going to a horse show because you won't be able to use tape markers or a measuring tape at the show!


Thursday, April 1, 2010

Jumper Tack: Martingales

The most commonly-seen martingale in the jumper ring is the running martingale. Contrary to what some riders might believe, the standing martingale is not illegal in the jumper ring; it is simply restricted to use in the lower heights only (or in the classes with lower prize money if you are showing in the US).

The standing martingale, which I covered in an earlier post about hunter tack, attaches to the bottom of a regular cavesson noseband to keep the horse from raising its head higher than a certain point.

The running martingale, on the other hand, has a forked strap that connects to the neck strap. The undivided end attaches to the girth while the forked end attaches to the reins. Each of the forked straps ends in a metal ring for the rein to pass through. When the horse raises its head too high, the martingale exerts downward pressure on the reins.

The running martingale is used so much in the jumper ring because it allows the horse much more freedom of movement than does the standing martingale. Because the standing martingale is fixed, there is never any additional give if the horse needs it. Because the running martingale has movement along the reins and is attached to the reins, which also have movement, it is far less restricting. If the horse needs to stretch out over a big jump or requires its head to recover from a stumble, it's easy to give the reins away and allow the horse that freedom.

To use a running martingale, slip the neck strap over your horse's head and attach the martingale to the girth. Unbuckle your reins (at the rider end, not the bit end) and thread one side through one ring, then thread the other side through the other ring before re-buckling the reins.

How tight should the martingale be? That depends, of course, on your horse, but a general rule is to have it long enough that you can pull the straps up to the throatlatch area when the martingale is on.

Make sure that the neck strap is adjusted snugly enough not to hang low and flop around, but not so tightly that the horse will have trouble flexing its neck with it on.

Also be careful not to use a running martingale if you don't have stoppers on your reins. Stoppers prevent the martingale rings from getting caught on the buckles near the bit.

So which martingales are you allowed to use, and when? I'll let the EC rules speak for themselves:

ARTICLE G502 TACK AND EQUIPMENT
1. ... Standing martingales [...] will be permitted in jumper classes where the height of the fences does not exceed 1.15m.
[...]
4. In the competition arena:
[...]
b) If running martingales are used, they must be unrestricted (For use of
standing martingales, see Article G502.1).