Showing posts with label Passports. Show all posts

Saturday, February 6, 2010

Providing Proof of Ownership for a Passport

The passport process can get very confusing when it comes to providing proof of ownership of your horse. Equine Canada asks that you provide a copy of one of the following before they will issue your horse a passport:
  • A copy of a bill of sale
  • Breed registration papers stating ownership
  • A sworn and notarized affidavit of ownership
Previously, a notary was not required to produce an affidavit to EC's standards. Starting in 2010, this has changed and the affidavit must be notarized. It is therefore in your best interests, if you have purchased your horse, to make sure that you get a bill of sale in order to avoid having to go through a notary to get a passport.

Also be sure to ask the previous owner whether the horse already has a passport. One horse is not allowed to have multiple passports so you need to be given your horse's passport by the previous owner if it already has one. If you are unhappy with your horse's passported name, don't worry! For a fee, you can send the passport to EC and have the name changed to one of your liking.

Make sure that whatever you send is a copy - no original documents!

Saturday, January 30, 2010

Taking the Perfect Passport Photo

In my last post I went step-by-step through the passport application process. Now it's time to find out what your horse's passport photo needs to look like. While photos in which your horse does not look its best can be accepted, remember that the photo will stay with your horse for life, so try to make it nice!

First I'll outline the basics:
  • Use an uncluttered background that contrasts with your horse's colour.
  • You can use either a halter or a bridle, but a bridle looks best. Make sure that the bridle is clean and well-fitting. If you must use a halter, use one made of leather if possible.
  • Stand your horse so that all four legs are visible. Ideally, the legs nearest to the photographer will be square under the horse and the legs on the far side will be placed more under the horse's belly.
  • Groom your horse well before taking the photo!
  • Try to have the horse take up most of the frame. The handler does not need to be in the photo.
  • Try to have the horse's head turned slightly towards the camera so that any markings are visible. Try not to have the head turned too much or your horse will look like it has no neck!
Now I will go through a few examples of potential passport photos in order to show you exactly why it's best to follow those outlines.

Example 1


While this horse is groomed beautifully and is standing against a nice background, this photo would not be suitable for a passport. This is because not all four legs are clearly visible. The right front leg is hidden completely and most of the right rear leg is hidden as well. This is, however, a very nice example of how much your horse's head should be turned towards the camera; the stripe on his face is visible but the head is not turned so much that it makes his body look out of proportion.

Example 2


This is a very nice photo that would likely be accepted for a passport. This horse is beautifully turned out and he is presented against a nice background. All four legs are clearly visible and he is taking up the entire frame. His shiny and well-fitting leather halter does not detract from the photo. The only downside to this photo is that the horse's head is not turned towards the camera. If his head was turned slightly towards the photographer so that his markings, or lack thereof, were visible, this photo would be perfect.
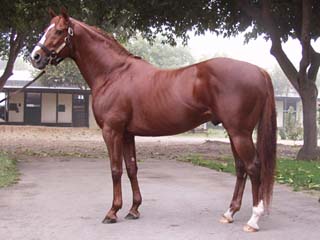
Example 3


This is again a photo that would probably be accepted for a passport. This horse is well-groomed and all four legs, as well as his facial markings, are clearly visible. The photo would be even better if the photo was not taken on a slight angle. Because the horse's back end is closer to the camera than the front end, his body looks slightly disproportional.  This is, however, only an aesthetic issue. The halter name plate is also slightly distracting but it is within the rules.

Example 4


This photo is not acceptable as a passport photo. Only two legs are clearly visible as the right front is hidden by the left front, and the right hind is hidden behind the tail. That is what would cause the photo to be refused, but there are aesthetic issues with this one as well. The horse's head is turned slightly towards the camera, which is good, but the over-sized blue nylon halter is distracting. The handler and the white lead rope are also visible and distracting. 


Thursday, January 28, 2010

Getting Your Horse a Passport

In Canada, some levels of showing require your horse to have a passport. The process can be somewhat confusing so I will try my best to guide you through it here.

Step 1 - Download the form

Click here and select "EC Passport Application". Open that file and print it out.


Step 2 - Fill out the form
  • Your horse does not need to be registered in order to have a passport so don't worry about leaving the Registered Name and Registration Number fields blank.
  • Eligibility is not as complicated as it sounds.  Just put the lowest division that your horse is eligible for. If your horse has never shown, put something like "Baby Green Hunter" so that you can show in any division.
  • You don't need to go too crazy with the Markings section since that part of the passport will be left blank to be filled out by your vet, anyway.
  • Be sure to include proof that you own the horse. Follow EC instructions for what qualifies as proof. You can also check out my post on providing proof of ownership.
Step 3 - Take a photo

Now you will need to wait for a nice day, grab your camera and groom your horse until he or she shines. This photo will stay with your horse for life, so make sure it's a good one! The instructions call for a 4" x 6" side-view colour photo of your untacked horse. I will give you tips on taking a good photo in my next post.

Step 4 - Send it in!

This step is pretty self-explanatory. Make sure to double-check that you have all the necessary documents and send it all off to be processed.

Step 5 - What to do with your new blank passport

Your new passport will look very empty when it arrives. Your horse's name will be filled out, the photo will be glued in and that will be about it! You will need to make an appointment for your vet to come fill out the markings page. He or she will outline and describe your horse's markings and then sign the passport. You must get this done or your passport will not be considered valid!

Step 6 - For ponies only!

If you have a pony, you will need to have the measurement page at the back of the passport filled out (this is not necessary for horses).  See the show steward(s) about this at your first horse show and they will measure your pony for you.