Sunday, March 21, 2010

Stabling Etiquette

Due to the compact nature of horse show stabling facilities, you will be spending a lot of time in close contact with your neighbours. For that reason, it's a good idea to be aware of good stabling etiquette before you get to the show so that you will still be on speaking terms by the end of it!

Unloading your trailer

Try not to block any roads (pull as far over as possible so that others can still get by). Do you best to unload quickly, without taking breaks, and move the trailer to the parking area as soon as you're done so that the next person can pull in. You don't need to set everything up as soon as it comes off the trailer; the most important thing is to get that trailer in and out of there quickly once the horses are settled in!

Setting up

Keep the aisles as clear as possible. Make sure that there's enough room left in a wide aisle for two horses (so that others can pass while you use the cross-ties) or enough for a horse to pass comfortably in a narrow aisle. The more you can keep off the ground, the better.

Keep everything in your own area. You can use the space in front of your own stall fronts, but don't overflow onto others' unless you are invited to. If you have any end stalls, you are entitled to use the space at the ends for storage, too. That end space is incredibly useful, so if you don't plan on using it, it's nice to offer it to your neighbours.

Cross-ties should be located so that any horse using them will be standing within your own area. If you are in a narrow aisle, it's best not to use cross-ties since any horse using them would block the aisle off completely.

Think hard about which horses will use which stalls. If you have an antisocial horse, try putting that one next to your tack stall or in an end stall so that he won't aggravate anyone else. If you are bringing a stallion, inform your neighbours about him and ask for their input on his housing arrangements, too (remember that any neighbours behind will be affected, too). If you have a horse that likes to chew on things, avoid putting him next to anyone's tack stall since some horses are capable of pulling things over the top of those short stall walls.

During the show

Make sure that other horses can pass through the aisle at all times (that means no leaving horses unattended in the aisle). Keep stall doors closed and make sure that any unfriendly horses are kept behind bars!

If you are allowed to bathe horses in the stabling area, make sure that you don't spray anyone else's stalls or equipment. This seems obvious, but when a horse is moving around a lot it can happen accidentally. Also try to keep the water shut off as much as possible or move your bathing area around so that you don't create a big mud puddle. If there are wash stalls available, don't keep your horse in one for longer than it takes you to bathe him so that another horse can use it without too long of a wait.

Leave everything how you found it. If you borrow a hose to water your horses, leave it neatly how you found it (it's usually safe to coil it as tightly as the owners do). The same applies for borrowing mounting blocks. After you've asked to borrow one, either use it where it already is or, if you must move it, ask someone on the ground to return it for you.

Keep the aisle clean. Any poop should be removed from the aisle or wash stall immediately and the aisle should be raked several times per day to keep it smooth and clean. 

Going home

The busiest time for trailers is the afternoon of the last day of the show because everyone wants to leave at the same time after the classes finish. Prepare by packing all of your things up in the morning so that everything can be loaded at once, without delays. Again, try to load quickly and then get out of there to make room for others.

If you are not comfortable navigating your trailer in tight spaces, don't attempt to pull up close to the barn during the busiest times because you might end up blocking others when you can't get back out! If you can't pull in nearby, try loading your things onto the back of a truck and then taking a few loads out to your trailer that way. If you have time, it can be much easier to just wait until your neighbours have left and then you can load at your own pace.


Saturday, March 20, 2010

The Hack Division

The Hack Division is not to be confused with the casual term, 'hack', often used to refer to the 'under saddle' class in a hunter division with jumping classes.  The Hack Division is not offered at every show but when it is offered, it is a great way to get young horses exposed to showing without adding jumps to the equation.

Here are the Equine Canada rules regarding hack classes:

CHAPTER 12
GENERAL RULES FOR HACK CLASSES

ARTICLE G1201 GENERAL
1. The hack division has been created to show the versatility of a horse or pony on the flat. The well-rounded hack horse or pony shows the versatility to perform well and adjust his way of going in each of these classes.
2. Horses or ponies in this division may be any breed or combination of breeds, and must have natural action (i.e. not high and/or weighted).

ARTICLE G1202 HACK JUDGES
1. All hack judges are subject to the general rules pertaining to all licensed EC officials in Rules of Equine Canada, Section A, General Regulations, Chapter 13, Officials.
2. Recognition, promotion, privileges and criteria are governed General Regulations, Chapter 13. Only hack division classes will be applicable for recognition and/or promotion.
3. The following seminars qualify as official hack judging seminars for recognition, promotion and upgrading upon approval of EC:
a) Arabian, Hunter or Morgan judging seminars offering a hack division segment
b) specialized hack judges’ seminars
4. The issuance of guest cards for hack judges is governed by the CAP (Competition Administration Policy).

ARTICLE G1203 CLASSES
1. Classes may be held for horses or ponies but combined horse-pony classes are not permitted; when classes for ponies are divided by height, such division must be made according to hunter pony heights. See Rules of Equine Canada, Section A, General Regulations, Glossary for definition of Pony.
2. Classes offered may be grouped according to the rider (i.e. the rider’s age) and according to the ribbons won by the horse (i.e. maiden, novice and limit).

ARTICLE G1204 TACK AND EQUIPMENT
1. English saddle of any type is required.
2. Bridles may be double, pelham, snaffle or kimberwick.
3. Martingales, breastplates, boots of any kind and/or bandages are not allowed.
4. Dropped and flash nosebands are prohibited.
5. Browbands shall be leather of any description but not solid white, coloured or sequined.
6. Spurs are optional.
7. Whips are NOT permitted in any hack class. See Rules of Equine Canada, Section A, General Regulations regarding the use of whips in the warm up areas.

ARTICLE G1205 ATTIRE
1. Permitted attire: Black jacket or dark coat, ASTM or BSI approved helmets with safety harness correctly fastened (see Article G102). White or light tan breeches, jodhpurs, white hunting stock or chokers, black or brown boots; black or brown smooth leather half chaps are permissible providing they match the boot colour (see Article G109).
2. Prohibited: saddle suits and/or Kentucky jodhpurs.

ARTICLE G1206 JUDGING
Except as noted in Articles G1304 and G1305:
1. Horses to stand without stretching.
2. Mounting, dismounting and rein back may be required.
3. Judges may require horses to be stripped for conformation judging in any hack class.
4. Entry is eliminated by any fall of horse or rider during the class. See Rules of Equine Canada, Section A, General Regulations, Glossary for definition of Fall.

[...]

CHAPTER 13
HACK CLASSES AND DIVISIONS

ARTICLE G1301 SHOW HACK HORSE OR SHOW HACK PONY
1. Type and Characteristics: Head neat, finely drawn and elegant. Mane must not be roached and may be braided; neck of sufficient length with a trim throat-latch; neck to blend into shoulders which are medium width and not too heavily muscled; medium high and well defined withers the same height as croup; chest well developed but in proportion; forearm not too heavily muscled; back moderately short but well proportioned with height; moderately deep girth and well shaped proportionate quarters; sloping pasterns of good length; feet of proportionate size. Show hacks must have vitality, animation, presence, balance and clean fine limbs showing supreme quality. Soundness is required and blemishes may be penalized. Braiding of mane and tail is optional.
2. Gaits:
a) The walk: straight, four beat and flat-footed
b) The trot: free, light and crisp, may be required as follows:
(i) On contact in a more upright frame
(ii) Collected with rider sitting
(iii) Extended - on contact - medium speed with legs moving forward with impulsion and the rider posting or sitting.
c) The canter may be required as follows:
(i) Collected
(ii) Normal
(iii) Extended
(iv) Hand gallop under control.
3. Class Routine and Judging:
a) Horses to enter ring at a walk.
b) To be shown at a walk, trot, canter and hand gallop; collected and extended gaits to be called for; To stand quietly; only 8 horses to hand gallop at one time. To be judged on 55% performance, 20% quality, 15% conformation and 10% manners.

ARTICLE G1302 ROAD HACK HORSE OR ROAD HACK PONY
1. Type and Characteristics: Head well shaped, attractive and proportionate; mane may be roached; natural (not set) tail; strong; well shaped neck with good length of rein; good strong sloping shoulders; medium high withers the same height as the croup; chest indicative of strength; moderately muscled forearm; back well proportioned with height; powerful across the loin; good depth of girth; well shaped proportionate quarters showing strength; sloping pasterns of good length; feet of proportionate size. The horse and pony must present an appearance of overall substance with refinement. Soundness is required and blemishes may be penalized. Braiding of mane and tail is optional.
2. Gaits:
a) The walk: straight, four beat and flat-footed with medium contact.
b) The trot: straight and true; may be required as follows:
(i) normal on light to medium contact
(ii) strong trot
c) The canter: normal on light to medium contact
d) Hand gallop under control
3. Class Routine and Judging:
a) Horses to enter ring at a walk.
b) To be shown at a flat-footed walk with a reasonably loose rein, trot, strong trot, easy canter and hand gallop. Only 8 horses to hand gallop at one time.
c) To be judged on 55% performance, 20% substance, 15% conformation and 10% manners.

ARTICLE G1303 ENGLISH PLEASURE HORSE OR HACK, ENGLISH PLEASURE
PONY OR PONY HACK
1. Type and Characteristics: see Article G1302.1
2. Class routine and judging:
a) To be shown at a flat-footed walk, normal trot and easy canter; not to gallop; light contact to be maintained.
b) To be judged on 45% performance, 40% manners and 15% conformation.

ARTICLE G1304 OPEN ENGLISH PLEASURE HORSE OR PONY ALL
BREEDS NON-RESTRICTED AS TO TACK AND ATTIRE
1. Classes may be divided into Saddle Seat or Hunter Seat.
2. To be shown at a flat-footed walk, normal trot and easy canter; not to gallop; light contact with the horse’s mouth; to be judged on manners, performance, quality and conformation.
3. Tack and personal appointments to be appropriate to the seat being ridden.
4. If ridden by a junior, heights of ponies and age of riders to be the same as in pony hunters.


The general guidelines for riding the different classes are the following:
  • Show hack: You want to be forward and flashy with the horse in more of a dressage-type frame. You must be able to extend and collect the gaits.
  • Road hack: Less about flash and more about getting the job done with impulsion while being an easy ride.
  • Pleasure hack: The focus is on manners. The horse should look like absolutely anyone could get on and ride it without a problem.

Thursday, March 18, 2010

Jumper Tack: Figure-Eight Noseband

You might have noticed that a lot of jumpers seem to use the figure-eight noseband as opposed to a regular cavesson or a regular cavesson with a flash.

There are several reasons why a rider might choose this type of noseband over another. Sometimes it is used simply because it is popular and riders like the look of it. More often, it serves a genuine purpose that a regular cavesson does not provide.

The figure-eight noseband is similar to the flash noseband in that both keep the horse's mouth from opening too wide. This can be very handy on course when your horse gets strong and you need to keep him from going too far in evading you. The figure-eight noseband goes one step further and also keeps the horse from crossing its jaw because the top of the noseband is fastened much higher up on the face.

The figure-eight has an advantage over the flash because it allows the horse to breathe more freely. A tightly fastened flash noseband can often restrict breathing if the horse flares its nostrils while working hard.   Because the figure-eight crosses much higher than a flash would attach, it leaves room for the nostrils to expand. One downside of the figure-eight is that if you plan on using a standing martingale (allowed in some low jumper classes), you will need a regular cavesson to attach it to.

From personal experience, I have found several horses to actually prefer the figure-eight over a flash noseband or even just a regular cavesson. I can only imagine that this is because the figure-eight doesn't really squeeze around any teeth since the higher strap passes over a padded section of the jaw and the lower strap passes over the interdental space. A regular cavesson, on the other hand, passes directly over the premolars.


Wednesday, March 17, 2010

Entering And Exiting The Hunter Ring

Something that is often overlooked by coaches when it comes to introducing a rider to the hunter ring is what happens before the first jump and after the last one. At best, not knowing what you're supposed to do will make your round look sloppy. At worst, it will eliminate you completely.

The Equine Canada rule concerning entering and exiting the hunter ring is the following:

Article G407

7. Circling a horse once upon entering the ring and once after completing the course is permissible, but any other circling, except to retake a fence in the case of a runout or refusal shall be counted as a disobedience. If an audible signal is used, this rule applies from the time the signal is given.

This means that if you circle more than once before beginning your course, you will be eliminated. You may also only circle once upon finishing, so don't endlessly circle before doing your downward transition.

Most of the time, the course designer will create a course that finishes going towards the in-gate so that the ring will run efficiently. This usually means, given the usual hunter course set-up, that the first jump will also be headed towards the in-gate. This means that you have two options upon entering the ring: you can either enter the ring, trot diagonally across the ring, pick up your canter and then go directly from there to the first jump, or you can insert a circle at the far end of the ring before heading towards the first jump. Let's look at the various options:

Example 1

This is a good plan. When your first jump is headed towards the in-gate, there is really no need to circle since you've had lots of time while crossing the ring to pick up your canter and get going. Most hunter riders would enter the ring at the trot and then pick up the canter when they hit the outside track. The line of entry can be adjusted based on whether or not you want your horse to have a close look at any of the jumps on the way in as well as how much room there is between the jumps and the rail. You can also enter the ring at a walk instead of a trot or adjust the location of your canter departure.

Here, one full circle is completed before the horse exits the ring. This allows a smooth finish to the round without breaking any rules. It also gives you the chance to show your horse off a bit - loosen the reins at the canter and give him a small pat. Make sure that you exit the ring at a walk; leaving the ring at the trot or canter is dangerous!

Example 2

This course shows you what not to do. While it is legal, it will take away from your round rather than add to it. In this course, the rider trots in across the diagonal just like before, but this time she circles before heading to jump 1. Since the rider has already taken the time to get from the in-gate to the opposite end of the ring, doing a circle is unnecessary and will slow the day down for the judge and everyone else.

Here, after the last jump, the riders exits the ring immediately without circling at all. While this is, again, legal, it will give your round a very abrupt end and detract from your previous flow unless it is done for a handy round (and it needs to be done very smoothly to benefit you even then).

Example 3

We have established that it is best not to circle before starting your round if the first jump is headed towards home, but what happens if the first jump is headed away from the in-gate?


Here is an ideal plan for such a course. You will enter the ring, immediately put yourself on a large circle and do one circle only before heading to your first jump. This circle will give you the opportunity to establish your canter without taking a tour of the entire ring.

This also shows a good finish to the course. The rider comes off the last jump and does a single circle before exiting the ring at a walk.

Example 4

This is probably the worst course plan you could come up with if your first jump is headed away from the ingate (again, unless it's a handy round and done very smoothly). Because the rider has not circled, there has been no opportunity to establish the pace and the judge might even miss your first jump if he is looking down, expecting for you to circle! There is a time and a place for such entries, such as in equitation classes where you want to show off your ability to establish the pace immediately. There is no place for this sort of a start in regular hunter classes.

This course also shows the same abrupt finish that we saw earlier. Even if you have finished the last jump, you are still being judged and you should make the end of your round count.

Now that we know when to circle and how you should never do more than one circle at a time, how big should you make your circles? A general rule of thumb is to use most of the empty space at the end of the ring.  If you make your circle too big, you risk nearly knocking over a standard or two. If you make your circle too small, your course will lack flow. Usually the course designer will arrange the jumps in such a way as to give you plenty of room for a nice big round circle.


Tuesday, March 16, 2010

Hunter Tack: Standing Martingale

The standing martingale is nearly ubiquitous in the hunter ring over fences. While both the standing martingale and the running martingale are both allowed by EC rules, the running martingale is almost never seen in the hunter ring.


The standing martingale consists of two crossed straps. One strap encircles the horse's neck while the other attaches at the girth, connects to the neck strap and then continues up to the underside of the noseband. It is used with a regular cavesson noseband only (the only noseband that is permissible in the hunter ring). The purpose of the standing martingale is to prevent the horse from raising its head too high. This has a safety aspect in addition to the aesthetic aspect in that it prevents the horse from potentially hitting the rider in the face when if it flips its head.

Most good hunters don't really need to wear a standing martingale since they carry themselves in such a consistently low frame anyway. Apart from the safety aspect, the standing martingale can also finish the look of a hunter. Some horses, especially those with big shoulders and/or long necks, can look naked without one. Most hunters will wear a standing martingale, whether or not it is really needed, as part of the standard hunter turnout.

The martingale should not be adjusted so tightly that there is no slack in it when the horse's head is in a comfortable position. Generally, a standing martingale is adjusted to anywhere between the length of the underside of the horse's neck and the length of the underside of the neck plus the underside of the jaw.

The neck strap should be snug enough not to flop around or hang low, while still allowing the horse freedom to flex and move its neck.

If you choose to use a standing martingale, make sure that you remove it before entering the ring for any flat classes. Also remove it completely, along with the saddle, if you are asked to jog into the ring for ribbons (leaving the martingale on for the jog is a faux pas).

Read this post for tips on fitting a standing martingale.


Monday, March 15, 2010

Hunter Under Saddle: Class Procedure

Hunter under saddle classes are some of the most predictable classes of the horse show. If you watch the higher levels, you will notice that all of the horses seem to enter the ring, head in the same direction and space themselves out automatically. If you know what to expect in an under saddle class, you can be that smooth, too!

Here is the official EC rule regarding the hunter under saddle class:

ARTICLE G316 OTHER HUNTER CLASSES
1. Hunter under saddle: to be shown at a walk, trot and canter both ways of the ring; at least eight horses, at the judge's discretion, if available, may be required to gallop one way in the ring but never more than eight at one time (pre-green and green hunters not to gallop). Light contact with the horse's mouth is permissible. In order to maintain awards, horses must compete and complete the course in at least one over fences class in their respective division. Hunter under saddle classes must never be the first class of a division.


These classes are judged on the horses' manners and way of going. The horses should have smooth, flowing movement with little knee action and should carry themselves in a relaxed way.


First, let's pretend that we are entering such a class and we'll go through what will happen throughout the entire thing:


Enter the ring at the walk: Walk through the ingate one by one.


Track left: Under saddle classes always start on the left rein. If you track left from the start, everyone will be able to get settled much more quickly and with less confusion.


Work until the class is called to order: Do whatever your horse needs since you are not being judged at this point. If your horse needs to relax, just walk. If you want to energize your horse a bit, do a lap at the canter. It's up to you.


The judge will call the class to order and you will be asked to walk: You are now being judged. You will walk for a couple of minutes while the judge looks over the class.


Trot: You are free to either post or sit, but the posting trot is much more likely to show your horse's trot off better. You will probably stay at the trot for quite some time while the judge takes a look at each horse and makes his or her initial order.


Walk: In most cases, you will be asked to walk before the canter.


Canter: Make sure that you pick up the left lead and you may either sit or two-point, depending on what works best for your horse.


Walk


Reverse at the walk: Change direction by doing a small half-circle in reverse at the walk (come off the wall first and then circle back so that you are circling on the new rein).  


Walk: The judge will watch everyone briefly at the walk.


Trot: The same as before - do whatever suits your horse best.


Walk: Very brief.


Canter: Again, make sure that you're on the right lead.


Walk and line up in the center of the ring with your back to the judge: Try not to park yourself too far from the rest of the group. Make sure that your horse halts correctly and stands there for as long as he can. If he gets fidgety, walk him in a small circle but it would be best for him to just stand nicely while the judge finalizes his or her decision.


Leave the line to collect your ribbon, or exit the ring at the walk after the last ribbon winner 


Here are some tips for a successful under saddle class:
  • Make sure that your transitions are smooth. You don't need to transition within the second after it is announced and a smooth, slightly delayed transition is better than a messy, quick one.
  • Use the crowds to your advantage. If your horse is looking great, try to separate yourself from the other horses so that you can be seen. If your horse is misbehaving, hide within a group of other horses.
  • Use the corners. Judges tend to watch the long sides more than the corners, so if you're careful you can use them to make adjustments. Keep track of where the judge seems to be looking so that you know when to really show off.
  • Make sure that your horse is not wearing a martingale or you will get eliminated after entering the ring!
  • Try to travel at a similar speed as the other horses in the ring. A horse that passes everyone else quickly or gets passed by everyone else will stand out in a negative way.
  • Keep track of what the other horses are doing. Sometimes it's difficult to hear the announcements and that is not how you want to lose a class. If you notice that most of the horses in the class are at a new gait, chances are that you should transition to it, too.


Sunday, March 14, 2010

Jumper Tack: Belly Pad

You might have noticed that some horses in the jumper ring wear an oddly shaped girth that is very wide in the belly area. This is called a belly pad girth (also called a belly guard or a stud guard).


So what is the purpose of this piece of tack? It protects the horse's belly from getting hit by the front hooves while jumping. Some horses fold their front legs up so much that the hooves contact the belly and this can cause the horse pain or injury, especially if the horse is wearing studs. Most belly pads have a snap, ring or narrow piece of leather for the attachment of a breast plate or martingale.

How do you know if your horse needs one? You will need someone to watch your horse jump over a period of time to see what sort of front leg technique he has. Some horses hit themselves so hard that you will actually notice them hanging their front legs over the next jump after hitting themselves in order not to do it again. If you notice that your horse is doing this, he would probably appreciate a belly pad. If you notice marks in the middle of your girth after jumping, your horse is probably hitting himself.

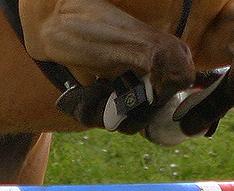
A horse with front end technique like this one would most likely benefit from using a belly pad, especially since he is wearing large studs in his front shoes. The belly pad would extend further forward than the current girth to protect the area that you can see is about to be hit.  The hooves will, in addition, hit different areas at different points of the jump so a single photo like this one will not tell you exactly where the horse needs extra protection.

If you aren't sure whether or not your horse needs a belly pad, there's no real harm in using one anyway apart from the higher price and the increased tack cleaning time (the larger surface area attracts a lot of mud!).