Tuesday, April 29, 2014

Hair Net Choices

As more hair net options become available, it can be difficult to know which one to choose without buying and trying them all. Hair nets marketed towards riders are generally thicker and more durable than ordinary hair nets that you might find elsewhere. There are currently three different types of equestrian hair nets (excluding "show bows", which are a big no-no in the hunter/jumper world!), each with their advantages and disadvantages. No type is perfect (unless you're not at all sensitive to knot pressure), so cost, comfort and ease of use need to be weighed against one another while making a choice.

Colour-wise, you should pick one that is closest to your hair colour as the goal is not to have the hair net itself stand out. If there is no exact match, a hairnet that is slightly lighter or darker that your hair colour is not likely to attract attention.

Two-Knot Hair Nets


Two-knot hair nets are the most traditional, they are easy to find and they tend to be the cheapest option available. Having two knots gathering the material makes for a hair net that is essentially the same shape all the way around to keep the hair fairly well-contained without any looser areas to puff out from under the helmet. They are available in a variety of colours to match most hair colours.

Advantages:

  • Inexpensive
  • Available in practically every tack shop
  • Even stretch all the way around
  • Available in a variety of colours

Disadvantages:

  • Knots can cause pressure points under a helmet
  • Don't contain hair well once the net has stretched

One-Knot Hair Nets


One knot hair nets are similar to the two-knot ones but have the advantage of one less pressure point, so you can choose a neutral location to position the knot at. Because of that, however, all the material is gathered at just one end, which creates a more baggy shape, especially as the weave loosens with wear.

Advantages:

  • Single knot can be placed where it won't cause a pressure point
  • Relatively inexpensive

Disadvantages:

  • Single knot causes the shape to be more baggy even before any stretching occurs

No-Knot Hair Nets


No knot hair nets are the newest on the equestrian market, and essentially consist of a wide band that goes around the head, leaving it open on top. They hold the hair tightest and make it easier to style the hair by holding everything in place against the head. For some, using a hair elastic might not even be necessary and they come with a handy storage pouch to keep them away from things like velcro and shavings that can ruin hairnets. Colour choice is the weakness here, with the colours either very light or very dark, and the packaging appears to be a bit misleading colour-wise.
A no-knot hairnet in its pouch (this
is the so-called "medium-brown")

Advantages:

  • No pressure points
  • Seemingly more robust netting
  • Holds hair more closely against the head 
  • Allows the hair to be put up without having to lean over
  • Comes with protective bag to help it last longer

Disadvantages:

  • Comparatively much more expensive
  • The band fits more tightly than the band of a traditional hair net
  • Colour options are limited (good for either very light or very dark hair)
  • Opaque packaging makes it difficult to find the correct colour
  • The band is fairly wide, which could make it blend in to your hair less easily


Thursday, April 10, 2014

Turnout Critique #13

This week's Turnout Critique is interesting because we have photos from a couple of different shows, showing the horse at two different levels of turnout and at two different body conditions.


This rider strikes me as someone who has recently had a growth spurt because while all of her apparel appears to have been chosen with care, several elements are too short. The jacket, while a good dark colour, appears too short, with the waist sitting too high and the bottom not coming far down enough. A good rule of thumb is that the bottom hem at the back of the jacket should just barely brush the seat of the saddle. The field boots are several inches too short and as a result they have dropped below the bottom of the rider's knee. Boots that are too short break up the lines of the leg and can give the illusion of strange proportions. For equitation classes in particular, care should be taken to choose boots that are not too short. When purchasing new boots, plan for them to drop an inch or two (which means that they will feel uncomfortably high on the knee at first).

The upper part of the boot is clean and well-polished, but the foot area appears dull. Unless the ground is so wet that it washes the polish away, polished boots should redevelop their shine after being wiped down. Care should be taken to ensure that the entire boot is polished before showing (and be aware that some leather conditioners can dull the finish and make it difficult for the boots to hold a shine). For an equitation class (which this appears to be), a small spur, even if it is a "dummy" spur, would help to draw the judge's eye to the nicely lowered heel.

This rider's hair is neatly contained in a conservative helmet and hairnet, and she could bring some hair down over her ears to complete the full "hunter hair" look.

She appears to be wearing a belt with her tucked-in show shirt, as is appropriate, and the breeches are well-chosen for their colour and fit, and are clean. Her black gloves are also well-chosen to complete the outfit.


Another reason why it appears that this rider might have had a recent growth spurt is that the saddle seems to be too small, both in the seat and the flap. You should be able to fit about a hand's width between the cantle and your seat, and the flap is almost entirely hidden by the rider's leg. I recommend that this rider work with her trainer and a good saddle fitter to evaluate whether it's time to move to a larger saddle. This does not have to be a huge expense because good quality saddles can be found used for much less than they would cost new.

This rider pointed out herself that the saddle pad is too large, but if the saddle needs to be replaced, the pad might actually end up being the correct size. The outline of the saddle pad, to me, matches the rider's leg better than the flap of the saddle does.

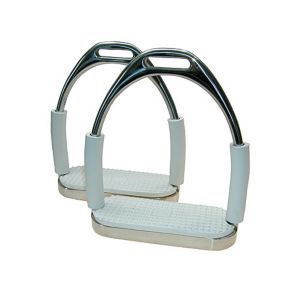
The excess stirrup leather is too long for my taste; I find this to be distracting particularly as a horse canters around, causing it to flap up and down. I would either trim the stirrup leathers so that the ends just extend past the edge of the saddle pad, or tuck the ends under the flap to visually shorten them. The silver-coloured stirrup irons are the correct choice for the equitation ring.

This horse is wearing leather boots, which are appropriate for equitation classes. If this horse were to enter a hunter class, the boots would need to be removed.

The bridle appears to be well-fitted and all of the tack seems to be clean and in good repair.

The horse is nicely braided and appears to have his face trimmed. His tail is sparse and to bring his turnout to the next level, I would try a fake tail when braiding to fill it out a little bit and balance his outline. I'm impressed by the turnout of all of the horses seen in these photos; for a local circuit final, these riders are doing a great job with their overall presentation.

The horse's coat is dull and he is lacking weight. In a case like this, I would seek advice from a vet in case the cause is something health-related such as worms or ulcers. If the horse is deemed to be healthy and just needs more weight, I would try adding oil to the feed for extra calories and to add some shine to the coat.


This final photo was taken some time later, after the horse had gained weight. In my opinion, he could still benefit from gaining a few more pounds and his coat is still on the dull side, so I would continue to lean towards adding oil to the feed if all else has been ruled out and the horse is being deeply groomed on a daily basis.

This time the horse is not braided, but he does have a pulled mane. While I'm told that this was just a local county show, I would still be tempted to braid the mane. Not only is it a good opportunity to practice your braiding skills where slightly less-than-perfect braids won't stand out, but when the horse is looking a bit rough temporarily yet is still capable of showing, putting those extra touches on the turnout is a way of making up for the dull coat or slight thinness. We also know that the peanut gallery will often be quick to criticize without knowing the full story, so putting added effort into the horse's turnout when there are minor issues that you can't control can be a way of expressing that you do care about your horse.  

Most of my comments from the earlier photos also apply to this one. The rider is now wearing spurs, which improve the look of her leg, but she should either trim the straps or tuck them in so that the ends don't hang down so low. The horse's tail looks fuller, either because it has grown out or because it is unbraided. It could probably use an extra brushing out before tacking up to make sure that the strands don't clump together.

When doing "hunter hair", this rider should make sure that some hair comes down to cover the tops of her ears along with the hairnet. In this photo, only the hairnet is over the ear, which creates a line splitting her ear in two.

The horse's white socks look fairly dirty despite the footing not appearing to be very wet, so I would suggest clipping the socks in the future to help keep them clean. Applying baby powder would also help to whiten the socks the day of the show.

Thank you very much to our featured rider for submitting these photos. She's doing a great job and with time and a wardrobe that better suits her height, she and her horse should look like winners. 

If you are interested in being featured in a future Turnout Critique, please send your photos to showringreadyblog@gmail.com

Wednesday, March 26, 2014

Equitation Stirrup Rule Update

When the new stirrup rule was announced for equitation riders, there were many unanswered questions regarding what exactly was meant by the rule and how judges would interpret it. Now that the rule has been in effect for a few months, some more information is starting to emerge. There is still confusion and the rules seem to be interpreted differently between Canada and the United States, but at least there are now some clues available.

The American rule is worded as follows:

EQ110 Appointments
4. The use of stirrups that have entirely black branches is not permitted in any Equitation class. The use of stirrups which have entirely black branches will automatically result in elimination.

The Canadian rule reads:

ARTICLE G1005 TACK AND EQUIPMENT
5. [...] Only silver-coloured stirrups are permitted in equitation or 
medal classes. Use of black or coloured stirrups will incur elimination.*

The American rule is clear on the point that stirrups with small amounts of black on them, such as stainless steel jointed stirrup irons with black joints, are permitted. This has been confirmed by Dover Saddlery, who received this statement from Lauren Fahey, the Director of Hunter Affiliates, USEF: "The rule will apply to stirrups that are entirely black, such as the composite stirrups sometimes used in show jumping. Stirrups with black rubber on the branches that cover a portion of the stainless steel will still be allowed for use in equitation when the new rule takes effect."

There have been reports of judges in the US eliminating riders for stirrup irons that they consider to be too dark, however, even if the stirrups are not actually black. This has occurred with composite stirrups that were marketed as a good choice for the equitation ring. The safest choice is therefore to either spray paint composite stirrups silver if only dark products are available, or to use a silver-coloured aluminum stirrup or traditional stainless steel stirrup iron (jointed or regular).

In Canada, while the competition season has yet to get into full swing (leaving us waiting to hear how the rule will actually be implemented at shows), apparently the Equine Canada Rules Committee has said that stainless steel stirrup irons with black joints will not be permitted in equitation classes at EC shows. Peacock-style safety stirrups with black elastics will still be permitted

It is not clear whether jointed stirrups with grey joints will be permitted, but I suspect that they will be allowed since the colour is close to silver and the rule is not worded against using jointed stirrups in the equitation ring.

To summarize:

For US equitation classes:
- You may not use stirrups with branches that are entirely black
- You may use silver jointed stirrup irons with black joints
- You risk elimination if you use composite stirrups that are not black, but still dark in colour

For Canadian equitation classes:
- You may not use stirrups that are not silver in colour
- You may not use silver jointed stirrup irons with black joints
- Any colour other than silver, even if metallic, puts you at risk of elimination

*Update to the update:

Jump Canada has released a clarification to make the rule more specific.

G1005.5 will now read:
"Stirrup irons must not be affixed to the rider's foot or boot in any manner. To facilitate the judge's view of the rider's foot position, black or coloured stirrups (other than silver/grey) or stirrups with black or coloured branches are not permitted and, if used, will incur elimination."

G1102.3 will now read:
"To facilitate the judge's view of the rider's foot position, black or coloured stirrups (other than silver/grey) or stirrups with black or coloured branches are not permitted and, if used, will incur elimination."

So grey joints are definitely permissible in Canada, which was also confirmed to me by someone in the know. The rule is still not completely clear on black joints, but I would continue to avoid them based on previous comments from Equine Canada. 


Friday, February 21, 2014

Turnout Critique #12

The first Turnout Critique submission of 2014 is a lovely example of good hunter turnout, with only a handful of minor improvements that could be made.


This horse is in good condition and is groomed thoroughly on a regular basis, as evidenced by the deep shine of his coat. If anything, he might be a little bit too fat, but jumping photos can sometimes be deceiving in that respect. He appears to be quite hot and sweaty, and could possibly benefit from being clipped if this show did not take place on an unusually hot day. The braids are nicely done as far as the photo shows.

All of the white markings have clearly been meticulously cleaned, and this good work would be highlighted by a fresh application of hoof oil to the feet.

The tack all appears to be properly fitted, clean and in good repair. The noseband would flatter the face better if it were put up a hole or two so that it sits just one finger's width below the cheekbone. We are often fooled into judging the size of the head by the length from the browband to the noseband, so the noseband should be kept up near the cheekbones to minimize this distance (bridles stretch over time, therefore this should be checked every so often).

The saddle pad is just the right shape for this saddle, with a very acceptable 1 1/2 inches of pad showing all the way around the edges. The excess length of stirrup leather is just short enough to be tidy without needing to be tucked or trimmed. The tack is a great example of not needing to have everything in the exact same colour. The saddle and girth match, making neither stand out to the eye. The martingale and bridle are darker in colour, but since they are on a separate part of the horse and are in a similar colour family to the saddle, nothing stands out as being different.

This rider is beautifully dressed in well-fitted beige breeches, belt, dark jacket, white show shirt with the now-common wrap collar and conservative black gloves. Her hair is neatly contained in the hunter style and she sports an appropriately conservative helmet by today's standards. My only problem is with her boots, which don't show the high shine of a pair that have been recently polished. She could also ask a groom to brush off the bottoms of her boots after she mounts for a cleaner look. The boots appear to be made of a thin, supple leather, which produces a lovely slim profile but could also require extra time spent polishing due to the leather's more porous surface.

The quality of this horse and rider combination is so high that any turnout faults are very minor. This rider appears to be a great example of someone who puts a strong effort into presenting herself well in front of the judges.

Many thanks to this week's featured rider for putting herself forward for a critique!

Any readers who are interested in being featured in a future edition of Turnout Critique can send photos to showringreadyblog@gmail.com


Friday, January 17, 2014

Is Your Bridle Really Clean?

Have you ever arrived at a horse show with tack that you thought you had cleaned thoroughly the night before, only to find that it looks dull or, worse, has noticeable grime on it? This is an easy situation to get into if you don't clean your tack daily or if you just quickly wipe down your tack without really giving attention to the areas where dirt builds up the most easily. Clean tack is not only a sign of respect for the judge, but it also contributes to that first impression that tells the judge whether or not you are there to win.

Wetting the layer of grime while washing tack can actually make the dirty layer temporarily appear dark and transparent, which is why you often notice the next day, when the tack is dry, that it isn't as clean as you thought it was. Tack that is truly clean has a very recognizable lustre and richness that is well worth the extra effort.

To avoid the surprise of tack that isn't as clean as you thought it was, there are certain areas of the bridle that can serve as warning signs that your tack needs a very thorough cleaning. Because it's difficult to spot the grime once it has gotten wet, I recommend scheduling the intensive cleaning session for at least two days before you show, giving you an opportunity to spot and re-clean any missed areas the next day. 

Here are the areas of the bridle to which you should pay extra attention. Other spots will still need attention, but I have found that these are the most easily missed:

Inside the browband and noseband:


These areas will not be visible while you're showing, but I imagine that horses must appreciate not having sticky, rough surfaces in contact with their faces. Less-than-thorough cleaning here will also often indicate a lack of cleaning elsewhere.

How to clean it: While some prefer to use a toothbrush to get into the small spaces, I actually prefer to scrape out the stitched areas with a fingernail, being careful not to scratch the leather. After a wipe with your soapy sponge, the grime should become soft enough to scrape off, and following up with a clean wet sponge should take care of any remaining residue.

The buckles:


Look closely at the buckles, particularly where the tongue of the buckle rests. Dirt builds up easily on buckles and dulls them. 

How to clean it: Use a wet, soapless sponge to wipe off any dirt. If there is a lot built up, gentle use of your fingernails can again be very effective. Be sure to lift up the various parts in order to clean the buckles thoroughly without leaving grimy edges.

The insides of your reins:


This is one of the worst locations for grime build-up, thanks to the movement of the reins against the often-sweaty neck. Not only does this indicate that your tack needs cleaning more often, but the grime is also visible from the other side under your horse's neck!

How to clean it: Once again, I find my fingernails to be most effective here. Wipe the area down with water and saddle soap to soften the dirt, and then run your fingernail gently down the length of the dirty area, making enough passes to cover the width of the rein. Wipe off any remaining residue with the sponge and then repeat as necessary. Don't forget to pay close attention to the raised strip where the grippy part of the reins begins.

Where the reins attach to the bit:


This area tends to attract a lot of saliva from the mouth, making it both a magnet for little bits of hay and prone to dryness. Keeping it clean (and conditioned) will help the leather last a long time without failing on you mid-ride.

How to clean it: Try to squish your sponge enough that it will fit in there and then expand to pull everything out with it. If that doesn't work, the trusty fingernail/toothbrush or unfastening it to open it all up will do the trick.

The throatlatch:


This is one of the least obvious areas to look at, but it is often dirty! There is an area on each side of the throatlatch, just above the bottom of the horse's chin, where dirt can build up thanks to the motion of the loose leather and any flexing of the head and neck. It usually creates a line that will be slightly dull or appear a slightly different colour than the rest of the throatlatch.

How to clean it: If sponging alone won't do it, gently run your fingernail down the dirty area and then sponge it off. I find that this area is one of the worst for appearing clean when wet and then reverting back to being dull when dry, so pay extra attention to it the day after the thorough tack cleaning.

Some other areas to pay attention to are any with deep stitching (surrounding any raised areas), as well as holes on straps which can become clogged with dirt (the tongue of the throat latch buckle is very handy for cleaning out clogged holes). These areas are, however, easy to clean in a single session and don't tend to suffer from the same level of grime build-up as do the above-mentioned trouble spots. If you are able to keep these five special areas clean, it's likely that the rest of your bridle will end up spotless as well.


Friday, January 10, 2014

FAQ, Part 12

How do you read distances on a hunter course diagram?

The distances on a course diagram for the hunter ring are usually written in feet rather than in strides. This allows you to see which lines are set shorter or longer than others (those heading towards the in-gate will generally be slightly longer to account for the horses being more eager to head "home"). If you memorize the multiples of 12, or whichever stride length your division is likely to be set at, you can quickly convert a 60 foot line into four strides, 72 feet to five strides, 84 feet to six strides, etc.

What should you do with the string on a fly veil?
A well-fitted fly veil with enough space
behind the ears for the bridle to sit upon

If the fly veil has a sufficiently wide piece behind the ears for the crown of the bridle to sit upon, the long string provided to keep the fly veil tied in place should be cut off. Quality fly veils generally do not come with these strings because they aren't needed to keep a well-designed bonnet on the head.

If you wish to compete using a fly veil that comes with a string, try riding with the string simply tucked away and not tied. If it stays in place, you should be able to safely cut the string off without worrying about your bonnet flying away. If your bridle does not keep the fly veil in place on its own, I would suggest keeping that one just for schooling and finding a different bonnet for showing. There are no rules against wrapping the string around the throat latch to tie a fly bonnet in place, but I find it messy-looking and distracting (and not wrapping the string puts you at risk of tying it too tightly).

What should you do if there is a loose horse?

The answer will depend on what the loose horse is doing and how your own horse tends to behave. Many recommendations call for dismounting your own horse, but that could lead to multiple loose horses if your horse gets spooked and pulls away from you. My preference in a warm-up ring is to stay mounted unless your horse is behaving in a dangerous way that could result in a bad fall. The exception to this is if the loose horse is a stallion and you are riding a mare. The safest place for the rider of a mare when there is a loose stallion around is off of the mare's back, so ride as far away from the stallion as you safely can and then dismount. You should not attempt to exit an enclosed area if opening the gate would risk the loose horse also getting out.

If those on the ground are having trouble catching the horse and you know that your horse is well-behaved in close proximity to other horses, you may attempt to calm and catch the loose horse by riding slowly towards it.

In the show ring, a loose horse can be contained in the ring until it is caught, and there is usually little danger to other horses if there is only one horse in the ring at a time (unless the horse jumps out of the ring, which will simply result in the above warm-up ring scenario). If a horse becomes loose during a flat class, you should listen for instructions from the judge as you remain under the judge's orders.

If you hear a call of "loose horse" in the stabling area, be on the alert. Loose horses can charge down aisles without notice and without regard for who or what might be in their way.

Which horse shoes are legal for showing in the hunter ring?

As far as I am aware, there are no rules in Canada about shoeing for the hunter ring (though it is always a good idea to double-check, and to check any local rules as well). The judge is unlikely to notice what is underneath your horse's feet while you are cantering by, anyway, so if a horse requires special shoeing (for example, an egg bar shoe), it is unlikely to be a factor in a performance class. It's possible that in a class judged on conformation a judge might take unconventional shoeing into account if it indicates that the horse has problems, but that would be at the individual judge's discretion and you could simply avoid entering such classes if your horse is shod specially. In the US, light pads and bar shoes are explicitly allowed, but it is noted that such shoes might count against horses in Conformation classes.

Steel and aluminum are both popular materials; many hunters are shod in aluminum because the shoes are lighter and therefore allow the horse to move better.

Avoid using hoof boots for hunter classes. While I am not aware of a rule that explicitly forbids them, they could fall under the general category of boots, and are unconventional on top of that. Hoof boots have a very obvious look and sound that would be difficult for any judge to miss.


Tuesday, December 3, 2013

Stabling vs. Shipping In

If a show is a relatively short drive away, you will often have the option of either shipping in every day or renting a stall. Even for a single-day show, day stalls or overnight stalls are sometimes available. There is no clear-cut answer as to what the best option will be for you; each option has its upsides and its downsides, and you will need to determine which are most important to you.

To help with that decision, here is a list of pros and cons related to each option:

Stabling (overnight)


Pros


  • Horse settles in on the first day, stays quieter throughout the show
  • The cost of the stall could work out to less than the cost of gas for shipping back and forth over multiple days
  • Horses can be safely left alone in their stalls
  • Stalls are often located near the show rings, closer than the ship-in parking
  • Horses drink and eat more readily, and are comfortable urinating
  • Easy location if using a professional braider
  • No ship-in fee

Cons


  • The cost of the stall
  • The cost of bedding down the stall (at an average of $6 to $8 per bag if buying from the show)
  • Having to stick around or come back for night check if not staying nearby
  • The time and manpower to load/unload all of the equipment and hay/grain/shavings being brought
  • No turnout unless the show has paddocks for rent

Shipping in


Pros 


  • Costs the least for a single-day show, and could cost less for a multi-day show, depending on distance
  • Horse gets to sleep at home in a comfortable environment and maybe get some turnout if the show days are short
  • Less to pack and unpack
  • No need to go to the show on days when you aren't showing
  • No extra barn chores besides those already being done at home

Cons


  • Some shows charge a ship-in fee that could offset any savings on the stall once the cost of gas is added in
  • Difficult to handle multiple horses, especially with certain trailer configurations in which the horses can't be accessed individually
  • The horses arrive excited each day, which could make a hot horse more difficult to handle 
  • Earlier mornings in order to load up and arrive in time for the first class
  • Ship-in parking can be far from the show rings
  • Space can be limited around the trailer if the parking area is small
  • Difficult to leave one horse alone if another needs to be at the show ring
  • Some horses won't drink or urinate on the trailer
  • The horses might need to be held outside of the trailer if the day is warm
  • Extra time at the end of the day to drive home and settle the horses back in
  • Difficult loaders might not want to get on and off the trailer repeatedly and therefore need to be held between classes

Day stall


Pros


  • Easier handling of horses than on the trailer (ability to access them individually)
  • Other horses nearby to keep a single horse company
  • Horses are more likely to drink and urinate in a stall
  • Stalls are often located near the show rings, closer than the ship-in parking
  • Easy location if using a professional braider (but must arrange to be done in the morning, not the night)
  • No ship-in fee
  • Horses can be left alone in any weather
  • Protection from the elements if it rains

Cons


  • Still need at least one bag of shavings per stall on top of the stall fee
  • Need to unpack some equipment and reload at the end of the day
  • Longer day than with shipping in because of the time to settle the horses and repack
  • Higher cost per day than multi-day stabling
  • Limited availability
  • More expensive than just shipping in and working off the trailer